
Aerial photography is the new in thing. Drones are becoming more prevalent and it’s not unusual to see two or three buzzing around the beaches in the morning. Although I have a drone and love the images that I get from it, I have wanted to shoot from a helicopter for such a long time. Firstly to experience that incredible perspective first hand and secondly to capture images that you simply can’t catch with a drone.
Finally, a couple of weeks ago, I took my my first flight and it was both awesome and terrifying at the same time!! This is my experience of shooting from a helicopter along with some tips and suggestions if you are thinking of taking a flight.
FIRST STEP - RESEARCH & PREPARE
Research and preparation are key to having a successful shoot. What locations do you want to photograph? How many are you likely to be able to do in the allotted time? What kind of images do you want? It’s worth saving any inspirational shots you see to show the pilot to give him or her a guide as to what you are hoping to achieve. In my mind, the most important question is ‘will the company you are going with operate a doors off flight’? There is no point spending all that money to have to shoot through dirty glass! The night before the flight, I did a lot of pre-preparation to make sure all my gear ready. I made sure all my batteries were charged, my SD cards were formatted and empty and my lenses were clean.
FLIGHT TIME
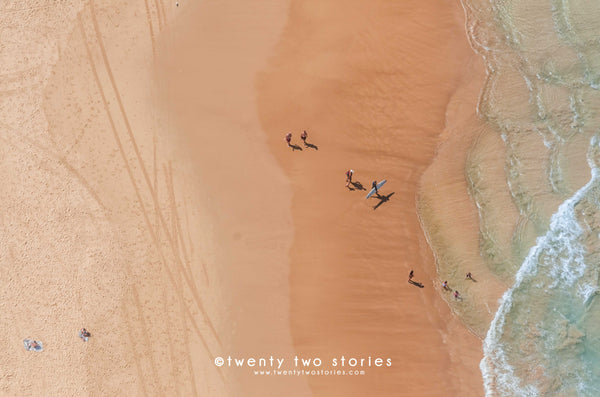
Then it was time for the flight itself. The first issue that I had to overcome is that I have a fear of heights. When the chopper first took to the skies, I was holding on for dear life and pretty much had my eyes closed constantly. I didn’t think I would even be able to pick up the camera, never mind take a picture!! I had to have a word with myself pretty quickly but for the first 10-15 minutes, I was mindlessly aiming the camera out of the door with little thought to composition. As a result, I messed up every single shot of one of my favourite locations (Bronte, obviously!)
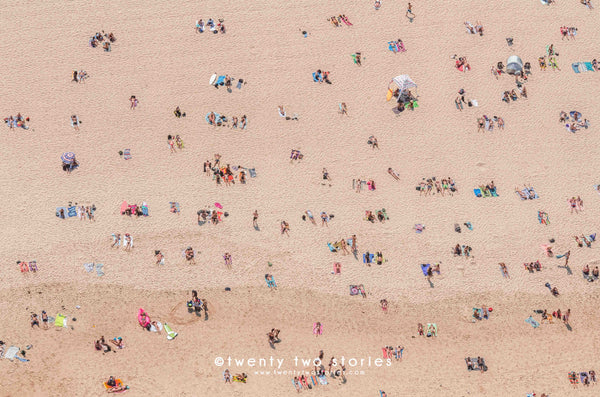
It’s exhilarating being up that high with the doors off and I found that I lost my concentration a lot. My advice would be to try and take a minute every now and then to check settings and re-focus. Whilst flying over Bondi, I somehow knocked my settings and ended up with about 50 very overexposed shots. Luckily, I took a look at the back of my camera after one lap and was able to fix it for the second lap.
CAMERA GEAR
I did some research online before my flight and there seemed to be conflicting advice as to which lens to use so I decided to take two cameras - one with a 24-70 lens and another with a 70-200 lens. I did however, underestimate how hard it would be to manage two cameras in a helicopter with the doors off. The straps kept getting tangled and I added unnecessary confusion by constantly trying to swap cameras to try and get the right shot. When I reviewed the images afterwards, all of the photos that I liked had been taken with the 70-200 lens. I rarely found an image that justified going below 70mm so if I were to do it all again (which I will!), I may only take one camera with a 70-200/300 lens. This really does depend on the kind of shot that you want though. If you want to take a photo with the helicopter in the frame, then a 70-200 lens won’t cut the mustard. One big benefit of taking two cameras, is that you have a back up if something should go wrong.
I also purchased a new, fast SD card as I knew I would be furiously snapping and wanted to be sure the card could keep up with me.
CAMERA SETTINGS
The most important setting for a helicopter shoot is shutter speed. The helicopter is moving very quickly and is prone to lots of bumps so motion blur is potentially a big issue. It’s important to set a shutter speed fast enough to eliminate this issue. I would recommend at least 1/1000th of a second and in practice, mine were between 1/1000th of a second and 1/2000th of a second. Obviously, the longer the focal length, the quicker the shutter speed needs to be.
I also wanted to ensure that the images were as sharp as possible so set my aperture to f/8 and then used Auto ISO. If you are shooting on a bright sunny day like I was then it’s unlikely the ISO will be higher than around 400 and you will ensure that images are as sharp as possible.
Settings are obviously dependent on the time that you fly. If you are flying near to sunrise or sunset, then you may need to compromise on the aperture settings to make sure the shutter speed is long enough. As I said before, always take the time to check images and settings as you are flying to ensure that settings are correct.
OTHER HINTS AND TIPS
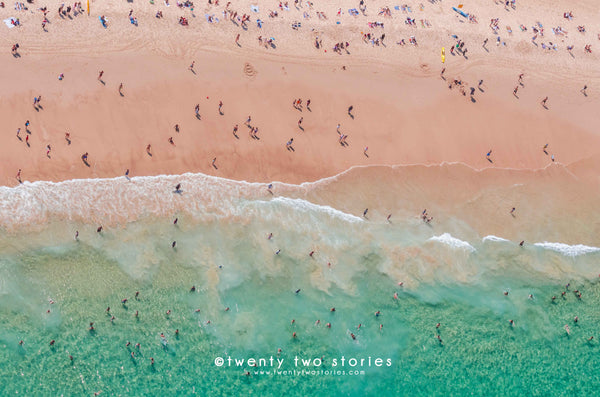
It’s also important to think about timing when booking your flight. Mine was booked for 2pm as I wanted to capture Sydney’s beaches at their busiest but I had to deal with a lot of glare on the water. Thankfully the pilot was also a photographer and pro-actively tried to find angles with less glare. Going a little later to get that late afternoon light may have been a better option.
Also make sure that you are assertive about what you want to achieve when in the air. Do you need one more lap of a particular location? Do you need to be in a slightly different position? Do you need to slow down? Given the cost of a flight ($1000+ in Sydney), it’s worth speaking up to make sure you get the shots that you want.
Speaking of price, one way to manage this is to find another photographer to share the cost. I did that and found it useful not only for saving money but also to have another voice in the helicopter reminding me to check settings and providing ideas for composition.
Finally, be sure to constantly think about different angles. It’s easy to get caught up in the moment and shoot the same thing over and over but given the high cost, you want to have a diverse collection of images.
I took over 700 photos during this first flight and I have kept 120 after the first round of editing but really, I have about 10 that I really, really like. Just like any other form of photography, i knew that it may take some time to get the hang of the different shooting conditions and I knew that it would be a learning experience. I definitely want to do it again and I have a much clearer idea of what gear I need to take and how I need to shoot. Here’s to the next flight!